Difference between revisions of "Temenos - Northern Tower"
From HomepointXI Wiki
(Created page with "category:Limbus __NOTOC__ *Temenos - Northern Tower is a subsection of the Temenos zone in the Limbus region. *It is reached via the Teleport-Holla crag entrance t...") |
m |
||
| Line 1: | Line 1: | ||
[[category:Limbus]] | [[category:Limbus]] | ||
__NOTOC__ | __NOTOC__ | ||
| − | *Temenos - Northern Tower is a subsection of the | + | *'''Temenos - Northern Tower''' is a subsection of the '''Temenos''' zone in the '''Limbus''' region. |
| − | *It is reached via the Teleport-Holla crag entrance to Al'Taieu. | + | *It is reached via the '''Teleport-Holla''' crag entrance to '''Al'Taieu'''. |
| − | *{{KeyItem}} | + | *{{KeyItem}}'''Cosmo-Cleanse''' and {{KeyItem}}'''White Card''' are required for entry. |
*All monsters in this area use their job's 1-hour ability. | *All monsters in this area use their job's 1-hour ability. | ||
*'''You can only open one chest per level.''' The chests spawn in random places. There is no set spot for either chest, and all of them can load in any of the three positions. | *'''You can only open one chest per level.''' The chests spawn in random places. There is no set spot for either chest, and all of them can load in any of the three positions. | ||
* The monsters that open the doors don't pop the chests. | * The monsters that open the doors don't pop the chests. | ||
**The Time chest is blue, and gives an additional 15 minutes. | **The Time chest is blue, and gives an additional 15 minutes. | ||
| − | **The Item chest is brown with gold trim, and on the lower 6 levels all have 4-7 | + | **The Item chest is brown with gold trim, and on the lower 6 levels all have 4-7 '''Ancient Beastcoins''' and 0-2 [[:Category:Artifact Armor +1|AF+1]] items. |
**The Restore chest is brown with silver trim, and refills HP/MP and restores all timers. | **The Restore chest is brown with silver trim, and refills HP/MP and restores all timers. | ||
*Defeating one/all of the beastmen drops all three chests; when there is a specific chest dropper, it is the furthest mob from the entrance. | *Defeating one/all of the beastmen drops all three chests; when there is a specific chest dropper, it is the furthest mob from the entrance. | ||
**It is possible to win with fewer Time chests if you skip some mobs and go straight for the chest dropper. | **It is possible to win with fewer Time chests if you skip some mobs and go straight for the chest dropper. | ||
| − | *Typical | + | *Typical '''Ancient Beastcoin''' yield: 50 |
| − | *'''Reward for completion:''' | + | *'''Reward for completion: Ivory Chip''' |
<br><br> | <br><br> | ||
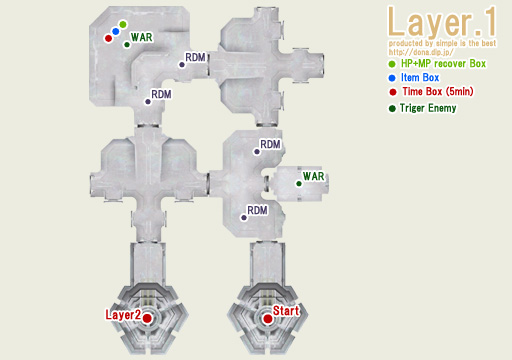
===First Floor=== | ===First Floor=== | ||
[[Image:Temenos-N1.jpg|right]] | [[Image:Temenos-N1.jpg|right]] | ||
| − | *Enemies: | + | *Enemies: '''Moblins''' |
| − | ** | + | **'''Moblin Dustman''' x4 (RDM) (moving) |
| − | ** | + | **'''Goblin Slaughterman''' x2 (WAR) (both stationary, one in NW corner, one in SE room) |
| − | *** About 3/6 drop an | + | *** About 3/6 drop an '''Ancient Beastcoin''' |
| − | *** The chests can spawn at either of the | + | *** The chests can spawn at either of the '''Goblin Slaughterman''' locations. |
| − | *The chest dropper is one of the | + | *The chest dropper is one of the '''Goblin Slaughterman''' in the NW corner OR SE corner. |
* With good timing, it is possible to run past the patrolling RDMs undetected. | * With good timing, it is possible to run past the patrolling RDMs undetected. | ||
* Defeating just the two Slaughtermen may not open the vortex. | * Defeating just the two Slaughtermen may not open the vortex. | ||
| Line 30: | Line 30: | ||
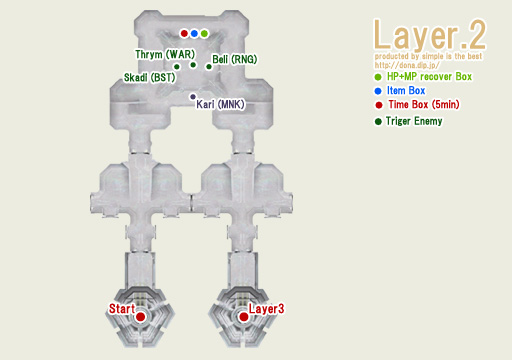
===Second Floor=== | ===Second Floor=== | ||
[[Image:Temenos-N2.jpg|right]] | [[Image:Temenos-N2.jpg|right]] | ||
| − | Enemies: | + | Enemies: '''Gigas''' |
| − | * | + | *'''Kari''' (MNK) (wandering around the outside, can be pulled without linking) |
| − | * | + | *'''Beli''' (RNG) |
| − | * | + | *'''Thrym''' (WAR) |
| − | * | + | *'''Skadi''' (BST) |
| − | **May use | + | **May use Charm, which lasts 3 minutes. |
| − | * Beli, Thrym, and Skadi | + | * Beli, Thrym, and Skadi can be slept. |
*Unlike normal gigas, they also detect by sound. | *Unlike normal gigas, they also detect by sound. | ||
| − | * About 3/4 drop an | + | * About 3/4 drop an '''Ancient Beastcoin'''. |
| − | * The chests appear in the middle of the north room. You just need to kill the center 3 to pop the chests, but | + | * The chests appear in the middle of the north room. You just need to kill the center 3 to pop the chests, but '''Kari''' opens the door. |
<br clear=all> | <br clear=all> | ||
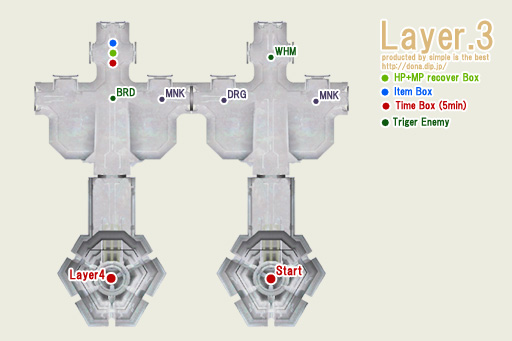
===Third Floor=== | ===Third Floor=== | ||
[[Image:Temenos-N3.jpg|right]] | [[Image:Temenos-N3.jpg|right]] | ||
| − | Enemies: | + | Enemies: '''Sahagin''' |
| − | * | + | *'''Telchines Monk''' x2 (wandering back and forth in the two rooms) |
| − | * | + | *'''Telchines White Mage''' (NE) |
| − | * | + | *'''Telchines Dragoon''' (wandering east-west) |
| − | ** | + | **'''Telchines's Wyvern''' |
| − | * | + | *'''Telchines Bard''' (NW) |
| − | *About 2/5 drop an | + | *About 2/5 drop an '''Ancient Beastcoin''' |
* One of the enemies opens the door upon defeat. | * One of the enemies opens the door upon defeat. | ||
<br clear=all> | <br clear=all> | ||
| Line 56: | Line 56: | ||
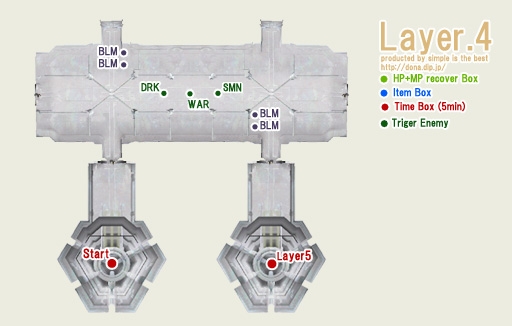
===Fourth Floor=== | ===Fourth Floor=== | ||
[[Image:Temenos-N4.jpg|right]] | [[Image:Temenos-N4.jpg|right]] | ||
| − | Enemies: | + | Enemies: '''Demons''' |
| − | * | + | *'''Kindred Black Mage''' x4 (2 groups of 2 running along the north and south sides of the room) |
| − | * | + | *'''Kindred Summoner''' |
| − | ** | + | **'''Kindred's Elemental''' |
| − | **Can summon a 2nd avatar for | + | **Can summon a 2nd avatar for Astral Flow. |
| − | * | + | *'''Kindred Warrior''' |
| − | * | + | *'''Kindred Dark Knight''' |
| − | * About 4/7 drop an | + | * About 4/7 drop an '''Ancient Beastcoin''' |
* The three unique demons are lined up in the center of the room; DRK in front (west), then WAR, then SMN. | * The three unique demons are lined up in the center of the room; DRK in front (west), then WAR, then SMN. | ||
** You can not pull from the back to prevent linking, so Sleepga all mobs and kill the SMN last. | ** You can not pull from the back to prevent linking, so Sleepga all mobs and kill the SMN last. | ||
| Line 69: | Line 69: | ||
* The chests appear in the middle of the room. | * The chests appear in the middle of the room. | ||
* You just need to kill the center 3 to pop the chests. | * You just need to kill the center 3 to pop the chests. | ||
| − | * One of the | + | * One of the Black Mages will open the door. |
<br clear=all> | <br clear=all> | ||
===Fifth Floor=== | ===Fifth Floor=== | ||
[[Image:Temenos-N5.jpg|right]] | [[Image:Temenos-N5.jpg|right]] | ||
| − | Enemies | + | Enemies: Antica] |
| − | * | + | *'''Praetorian Guard CCXX''' (WAR) (SE room) |
| − | * | + | *'''Praetorian Guard LXXIII''' (BLM) (NE room) |
| − | * | + | *'''Praetorian Guard CXLVIII''' (RNG) (NW room) |
| − | * | + | *'''Praetorian Guard CCCXI''' (PLD) (SW room) |
| − | * Bring | + | * Bring Echo Drops for Jamming Wave (range 15'). |
| − | * About 2/4 drop an | + | * About 2/4 drop an '''Ancient Beastcoin''' |
* The chests appear in the east-west door after defeating all Antica. | * The chests appear in the east-west door after defeating all Antica. | ||
<br clear=all> | <br clear=all> | ||
| Line 86: | Line 86: | ||
===Sixth Floor=== | ===Sixth Floor=== | ||
[[Image:Temenos-N6.jpg|right]] | [[Image:Temenos-N6.jpg|right]] | ||
| − | Enemies: | + | Enemies: '''Tonberries''' |
| − | * | + | *'''Cryptonberry Designator''' x3 ([[SMN]]) (wandering) |
| − | ** | + | **'''Tonberry's Elemental''' (Light) |
| − | **The avatar summoned for | + | **The avatar summoned for Astral Flow is random. Stoneskin is your best bet, or not fighting the Designators at all. |
| − | * | + | *'''Cryptonberry Abductor''' x3 (THF) (wandering) |
*There are two sets of SMN and THF in linked pairs near the doorways. A single THF and a single SMN walk alone between rooms. | *There are two sets of SMN and THF in linked pairs near the doorways. A single THF and a single SMN walk alone between rooms. | ||
| − | **Either the | + | **Either the '''Cryptonberry Designator''' or '''Cryptonberry Abductor''' will open the portal. The lone THF is recommended. |
| − | * | + | *'''Cryptonberry Charmer''' (BLM) (NW) |
| − | * | + | *'''Cryptonberry Skulker''' (NIN) (NE) |
| − | **Uses | + | **Uses Mijin Gakure (range 20'). |
| − | * About 7/8 drop an | + | * About 7/8 drop an '''Ancient Beastcoin''' |
<br clear=all> | <br clear=all> | ||
===Seventh Floor=== | ===Seventh Floor=== | ||
[[Image:Temenos-N7.jpg|right]] | [[Image:Temenos-N7.jpg|right]] | ||
| − | Enemies: | + | Enemies: '''Goblins''' |
| − | * | + | *'''Goblin Theurgist''' x2 (BLM) |
| − | * | + | *'''Goblin Fencer''' x2 (RDM) |
| − | * | + | *'''Goblin Warlord''' (DRK) |
| − | * All drop 1-2 | + | * All drop 1-2 '''Ancient Beastcoins''' |
* Cannot pull from the side without linking all the others. | * Cannot pull from the side without linking all the others. | ||
* Can be pet pulled, though as always this can fail if the mob stops to cast before chasing you, giving the others time to link. | * Can be pet pulled, though as always this can fail if the mob stops to cast before chasing you, giving the others time to link. | ||
| Line 111: | Line 111: | ||
** A way to avoid casting of an offensive spell on the pull is to run away after sending in your pet so that you are out of casting range when your pet is gone. This doesn't work as well with RDM, since RDM has more buff spells. | ** A way to avoid casting of an offensive spell on the pull is to run away after sending in your pet so that you are out of casting range when your pet is gone. This doesn't work as well with RDM, since RDM has more buff spells. | ||
* The final chest appears in the middle of the room when all the goblins are defeated. | * The final chest appears in the middle of the room when all the goblins are defeated. | ||
| − | ** It contains 6 | + | ** It contains 6 '''Ancient Beastcoins''', an [[:Category:Artifact Armor +1|AF+1]] item, the '''Ivory Chip''', and a chance to drop a '''Metal Chip'''. |
Revision as of 21:30, 25 January 2018
- Temenos - Northern Tower is a subsection of the Temenos zone in the Limbus region.
- It is reached via the Teleport-Holla crag entrance to Al'Taieu.
 Cosmo-Cleanse and
  White Card are required for entry.
- All monsters in this area use their job's 1-hour ability.
- You can only open one chest per level. The chests spawn in random places. There is no set spot for either chest, and all of them can load in any of the three positions.
- The monsters that open the doors don't pop the chests.
- The Time chest is blue, and gives an additional 15 minutes.
- The Item chest is brown with gold trim, and on the lower 6 levels all have 4-7 Ancient Beastcoins and 0-2 AF+1 items.
- The Restore chest is brown with silver trim, and refills HP/MP and restores all timers.
- Defeating one/all of the beastmen drops all three chests; when there is a specific chest dropper, it is the furthest mob from the entrance.
- It is possible to win with fewer Time chests if you skip some mobs and go straight for the chest dropper.
- Typical Ancient Beastcoin yield: 50
- Reward for completion: Ivory Chip
First Floor
- Enemies: Moblins
- Moblin Dustman x4 (RDM) (moving)
- Goblin Slaughterman x2 (WAR) (both stationary, one in NW corner, one in SE room)
- About 3/6 drop an Ancient Beastcoin
- The chests can spawn at either of the Goblin Slaughterman locations.
- The chest dropper is one of the Goblin Slaughterman in the NW corner OR SE corner.
- With good timing, it is possible to run past the patrolling RDMs undetected.
- Defeating just the two Slaughtermen may not open the vortex.
Second Floor
Enemies: Gigas
- Kari (MNK) (wandering around the outside, can be pulled without linking)
- Beli (RNG)
- Thrym (WAR)
- Skadi (BST)
- May use Charm, which lasts 3 minutes.
- Beli, Thrym, and Skadi can be slept.
- Unlike normal gigas, they also detect by sound.
- About 3/4 drop an Ancient Beastcoin.
- The chests appear in the middle of the north room. You just need to kill the center 3 to pop the chests, but Kari opens the door.
Third Floor
Enemies: Sahagin
- Telchines Monk x2 (wandering back and forth in the two rooms)
- Telchines White Mage (NE)
- Telchines Dragoon (wandering east-west)
- Telchines's Wyvern
- Telchines Bard (NW)
- About 2/5 drop an Ancient Beastcoin
- One of the enemies opens the door upon defeat.
Fourth Floor
Enemies: Demons
- Kindred Black Mage x4 (2 groups of 2 running along the north and south sides of the room)
- Kindred Summoner
- Kindred's Elemental
- Can summon a 2nd avatar for Astral Flow.
- Kindred Warrior
- Kindred Dark Knight
- About 4/7 drop an Ancient Beastcoin
- The three unique demons are lined up in the center of the room; DRK in front (west), then WAR, then SMN.
- You can not pull from the back to prevent linking, so Sleepga all mobs and kill the SMN last.
- You can pull the BLMs without linking the DRK, WAR, and SMN.
- The chests appear in the middle of the room.
- You just need to kill the center 3 to pop the chests.
- One of the Black Mages will open the door.
Fifth Floor
Enemies: Antica]
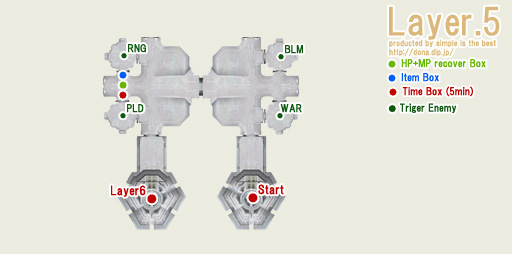
- Praetorian Guard CCXX (WAR) (SE room)
- Praetorian Guard LXXIII (BLM) (NE room)
- Praetorian Guard CXLVIII (RNG) (NW room)
- Praetorian Guard CCCXI (PLD) (SW room)
- Bring Echo Drops for Jamming Wave (range 15').
- About 2/4 drop an Ancient Beastcoin
- The chests appear in the east-west door after defeating all Antica.
Sixth Floor
Enemies: Tonberries
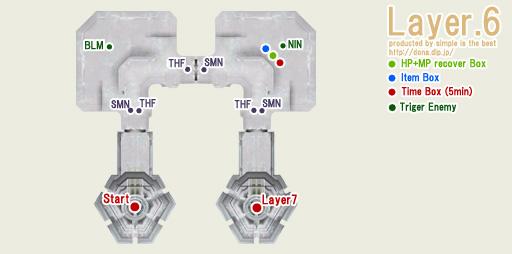
- Cryptonberry Designator x3 (SMN) (wandering)
- Tonberry's Elemental (Light)
- The avatar summoned for Astral Flow is random. Stoneskin is your best bet, or not fighting the Designators at all.
- Cryptonberry Abductor x3 (THF) (wandering)
- There are two sets of SMN and THF in linked pairs near the doorways. A single THF and a single SMN walk alone between rooms.
- Either the Cryptonberry Designator or Cryptonberry Abductor will open the portal. The lone THF is recommended.
- Cryptonberry Charmer (BLM) (NW)
- Cryptonberry Skulker (NIN) (NE)
- Uses Mijin Gakure (range 20').
- About 7/8 drop an Ancient Beastcoin
Seventh Floor
Enemies: Goblins
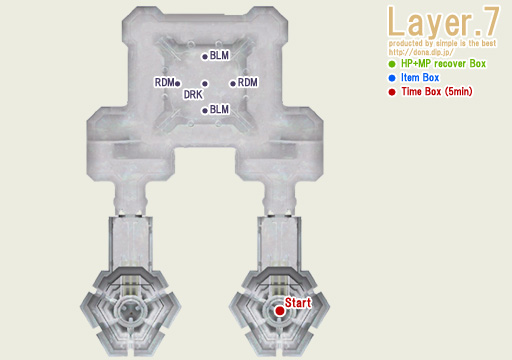
- Goblin Theurgist x2 (BLM)
- Goblin Fencer x2 (RDM)
- Goblin Warlord (DRK)
- All drop 1-2 Ancient Beastcoins
- Cannot pull from the side without linking all the others.
- Can be pet pulled, though as always this can fail if the mob stops to cast before chasing you, giving the others time to link.
- One way to avoid all casting on pulls is to pull a mob right after it casts a buff spell.
- A way to avoid casting of an offensive spell on the pull is to run away after sending in your pet so that you are out of casting range when your pet is gone. This doesn't work as well with RDM, since RDM has more buff spells.
- The final chest appears in the middle of the room when all the goblins are defeated.
- It contains 6 Ancient Beastcoins, an AF+1 item, the Ivory Chip, and a chance to drop a Metal Chip.
