Difference between revisions of "Ashita Plugins"
From HomepointXI Wiki
m (→Ashita Plugins) |
m |
||
| Line 35: | Line 35: | ||
* <span class=plainlinks>[https://git.ashitaxi.com/Plugins/GearLock/archive/7faff6f4912eb4cfcf638bedf2cf55d0ebed2fdb.zip GearLock - Prevents character blinking during equipment swaps.]</span> | * <span class=plainlinks>[https://git.ashitaxi.com/Plugins/GearLock/archive/7faff6f4912eb4cfcf638bedf2cf55d0ebed2fdb.zip GearLock - Prevents character blinking during equipment swaps.]</span> | ||
| + | |||
| + | * <span class=plainlinks>[https://git.ashitaxi.com/Plugins/Greed/archive/c4fdb9f84cf7b03797b312c1871e155cc9b740cc.zip Greed - World of Warcraft's popular Grid and Clique addons for FFXI.]</span> | ||
| + | |||
| + | * <span class=plainlinks>[https://git.ashitaxi.com/Plugins/Guildwork/archive/fee4a3baf9042e9aece736a9b6508969efd24c5c.zip Guildwork - Guildwork.com website interaction built into a plugin! Manage your characters and other information directly within Ashita.]</span> | ||
* <span class=plainlinks>[https://git.ashitaxi.com/Plugins/HardwareMouse/archive/0235a9eb89d83f1d0c4039937616b91372b9e7e0.zip HardwareMouse - Force-enables a hardware mouse cursor for the game client. Useful for those using proxies such as dgVoodoo2 that mess up the cursor.]</span> | * <span class=plainlinks>[https://git.ashitaxi.com/Plugins/HardwareMouse/archive/0235a9eb89d83f1d0c4039937616b91372b9e7e0.zip HardwareMouse - Force-enables a hardware mouse cursor for the game client. Useful for those using proxies such as dgVoodoo2 that mess up the cursor.]</span> | ||
Revision as of 14:19, 18 May 2022
Installation Process
For any of the below Ashita plugins, use the following process to install:
- Click on the link to download the .zip file.
- Navigate to where you downloaded the .zip file to
- Open the downloaded .zip file by double-clicking on it.
- In the downloaded .zip file, open the release folder by double-clicking on it.
- Click on the Extract All button on the Extract → Compressed Folder Tools ribbon
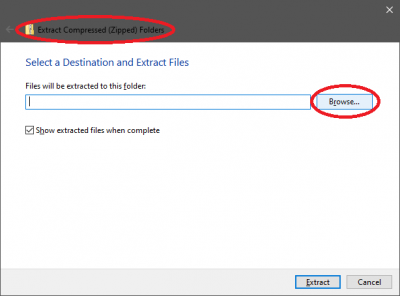
- Click on the Browse button on the window that appears (the Extract Compressed (Zipped) Folders window).
- On the window that appears (the Select a destination window), navigate to the folder that you Ashita installed to (default is C:\Ashita\).
- Click on the the Select Folder button on the window.
- Click on the the Extract button on the window (the Extract Compressed (Zipped) Folders window).
- If you are prompted to overwrite files, accept this!

