Dynamis - Buburimu
From HomepointXI Wiki
Contents
Dynamis - Buburimu
General Info
- Multiboxing is strictly forbidden in Dynamis. It can crash your client and/or bring the server down.
- Do not one-shot statues. NMs are spawned so pop items are not used. You must attack Statues in order to spawn the necessary NMs to complete Dynamis.
| Type | CoP Dynamis |
|---|---|
| Entry | Hieroglyphics, Buburimu Peninsula (I-9) |
| Requirements | CoP mission progress beyond 3-5, "Darkness Named" |
| Initial Time Allotment | 60 minutes |
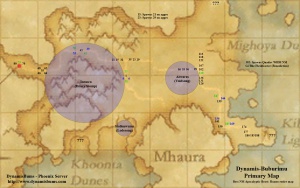
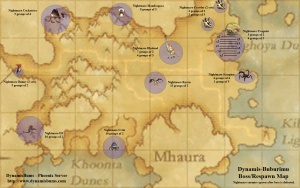
Maps
WARNING: MAPS ARE INCOMPLETE!
Time Extensions
| Extension | Time |
|---|---|
| Apocalyptic Beast | 60 minutes |
Total Extensions: 60 minutes
Strategy
Basic Strategy
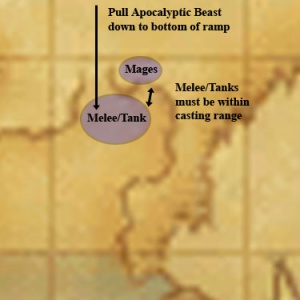
- Alliances camp on the beach area directly west of Mhaura. Mages on the upper edge of the cliff will not be affected by Dragon AoE abilities.
- (Order optional) Pull and clear Dragon NM Stollenwurm. This removes Apocalyptic Beast's Lodesong ability.
- (Order optional) Pull and clear Dragon NM Aitvaras. This removes Apocalyptic Beast's Voidsong ability. Alliances should make sure to reapply removed buffs after Aitvaras has been defeated.
- (Order optional) Pull and clear Dragon NM Tarasca. This removes Apocalyptic Beast's Heavy Stomp ability.
- (Order optional) Pull and clear Quadav NM Gi'Bhe Fleshfeaster. This removes Apocalyptic Beast's Benediction ability.
- It is not necessary to clear additional dragons prior to pulling Apocalyptic Beast. The remaining dragons will disappear once Apocalytpic Beast has been defeated.
Boss Strategy
- Using the same camp, pull Apocalyptic Beast to the beach area at the bottom of the ramp, staying within casting range of mages at the top of the cliff.
- Certain abilities will be "removed" from Apocalyptic Beast, varying with the Dragon and Beastman NMs defeated prior to pull. Apocalyptic Beast will "use" them, but there will be no effect.
- Apocalyptic randomly uses dragon special abilities, and cycles through the two-hour abilities of each job as they are listed in the standard job list (eg., Mighty Strikes => Hundred Fists => Benediction => Manafont, etc.) every 45-75 seconds.
- Defeat Apocalyptic Beast.
Defeating Apocalyptic Beast grants a 60-minute time extension and a small chance to receive 4 random 100-piece currencies.
General Advice
- Due to the subjob restriction, players entering Dynamis-Buburimu while the restriction is in effect will automatically lose all buffs applied outside the Heiroglyphics. It is possible to clear the subjob restriction and allow players to enter Dynamis-Buburimu without losing buffs applied outside the zone.
- Terrain can be used to avoid certain AoE abilities. Use it to your advantage!
- To take full advantage of limited run time, kill only necessary NMs prior to fighting Apocalyptic Beast. It can be advantageous to have multiple players tracking and pulling NMs to be killed in quick succession.
- It is not possible for Apocalyptic Beast to have the effects of two job-related abilities simultaneously (ie., it cannot both have Mighty Strikes and Hundred Fists active, Hundred Fists would be used after Mighty Strikes wears off). Apocalyptic Beast begins cycling through job abilities on aggro.
- Apocalyptic Beast has some resistance to Stun.
- During Chainspell, Apocalyptic Beast will cast enfeebling -ga spells (eg., Blindga, Paralyga, Bindga,). During Manafont, it will cast series III -ga.
Clearing Nightmare Uragnites:
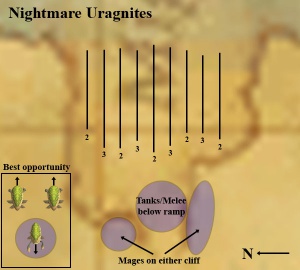
- Nightmare Uragnites travel along east-west lines across the beach. Though each Uragnites travels at the same speed, the paths vary in length, thus it is possible to pull them safely without linking as they will not always be aligned with other uragnites on either side.
- As listed on the map, Nightmare Uragnites spawn either one or two additional uragnites when pulled (two or three total).
- Spawned Nightmare Uragnites appear along the path the pulled Uragnite travels, not in pre-specified positions. Pullers must be careful not to link additional Uragnites when pulling from the north or south edges back to the alliance.
- It is easiest to pull the groups of two Uragnites before pulling groups of three. Pulling becomes easier as the lines begin to thin.
- It is well worth the time waiting for Uragnites to be in a safe position rather than pull hastily and link the entire area. Pull a Nightmare Uragnite as it is approaching and Uragnites on either side are returning to the water.
- To limit exposure to Poison, Plague, and Gravity, supporting mages should camp on the cliffs while melee and tanks should fight below.
- After a significant amount of damage, Nightmare Uragnites enter their shell for a random length of time. During this period, they resist all forms of damage and begin to regenerate HP.
- Nightmare Uragnites use Venom Shell when damaged while it is inside its shell. Melee-heavy alliances face being constantly poisoned and plagued. Be prepared to use lots of Antidotes if necessary.
- If possible, TP should be saved until a Nightmare Uragnite is outside of its shell for greater potential damage.
- Nightmare Uragnites can easily be killed by groups of BLMs by coordinating their spell casting to land simultaneously. Early casts will cause the Uragnite to enter its shell, wasting potential damage and triggering Venom Shell when other spells later land. Nightmare Uragnites can be Aspired and Drained while it is in its shell with no resistance penalty.
Zone Item Drops
Relic Armor
Beastmen in Dynamis-Valkurm have a probability of dropping LV71-specific armor.
- Warrior's Mufflers (WAR Hands)
- Melee Hose (MNK Legs)
- Cleric's Cap (WHM Head)
- Sorcerer's Gloves (BLM Hands)
- Duelist's Gloves (RDM Hands)
- Assassin's Vest (THF Body)
- Valor Gauntlets (PLD Hands)
- Abyss Gauntlets (DRK Hands)
- Monster Jackcoat (BST Body)
- Bard's Roundlet (BRD Head)
- Scout's Braccae (RNG Legs)
- Saotome Haidate (SAM Legs)
- Koga Kyahan (NIN Feet)
- Wyrm Greaves (DRG Feet)
- Summoner's Bracers (SMN Hands)
- Mirage Shalwar (BLU Legs)
- Commodore Gants (COR Hands)
- Pantin Babouches (PUP Feet)
- Etoile Tiara (DNC Head)
- Argute Loafers (SCH Feet)
Relic Armor -1
Nightmare enemies have a probability of dropping a random armor -1 item when defeated:
- Warrior's Mufflers -1 (WAR)
- Melee Gloves -1 (MNK)
- Cleric's Mitts -1 (WHM)
- Sorcerer's Gloves -1 (BLM)
- Duelist's Gloves -1 (RDM)
- Assassin's Armlets -1 (THF)
- Valor Gauntlets -1 (PLD)
- Abyss Gauntlets -1 (DRK)
- Monster Gloves -1 (BST)
- Bard's Cuffs -1 (BRD)
- Scout's Bracers -1 (RNG)
- Saotome Kote -1 (SAM)
- Koga Tekko -1 (NIN)
- Wyrm Finger Gauntlets -1 (DRG)
- Summoner's Bracers -1 (SMN)
- Mirage Bazubands -1 (BLU)
- Commodore Gants -1 (COR)
- Pantin Dastanas -1 (PUP)
- Etoile Bangles -1 (DNC)
- Argute Bracers -1 (SCH)
Relic Accessories
| Accessories | Nightmare Groups |
|---|---|
| Valor Cape (PLD) Bard's Cape (BRD) Wyrm Belt (DRG) Melee Cape (MNK) T. Whiteshell |
Nightmare Crab Nightmare Dhamel Nightmare Scorpion |
| Abyss Cape (DRK) Mirage Mantle (BLU) Duelist's Belt (RDM) Koga Sarashi (NIN) 1 Byne Bill |
Nightmare Crawler Nightmare Raven Nightmare Uragnite |
| Pantin Cape (PUP) Sorcerer's Belt (BLM) Scout's Belt (RNG) Warrior's Stone (WAR) O. Bronzepiece |
Nightmare Bunny Nightmare Eft Nightmare Mandragora |
Relic +2 Item
- Forgotten Step (Feet)
Currency
- One Byne Bill
- One Hundred Byne Bill
- Tukuku Whiteshell
- Lungo-Nango Jadeshell
- Ordelle Bronzepiece
- Montiont Silverpiece
General & Synthesis Items
Beastiary
Notorious Monsters
| Name | Job(s) | Spawn Location | Notes |
|---|---|---|---|
| Shamblix Rottenheart | DRK | Goblin Replica 1 | Defeat removes Apocalyptic Beast's Blood Weapon ability |
| Gosspix Blabberlips | RDM | Goblin Replica 15 | Defeat removes Apocalyptic Beast's Chainspell ability |
| Woodnix Shrillwhistle | BST | Goblin Replica 23 | Defeat removes Apocalyptic Beast's Charm/Familiar ability |
| Lyncean Juwgneg | RNG | Warchief Tombstone 45 | Defeat removes Apocalyptic Beast's Eagle Eye Shot ability |
| Hamfist Gukhbuk | MNK | Warchief Tombstone 55 | Defeat removes Apocalyptic Beast's Hundred Fists ability |
| Flamecaller Zoeqdoq | BLM | Warchief Tombstone 70 | Defeat removes Apocalyptic Beast's Manafont ability |
| Elvaansticker Bxafraff | DRG | Warchief Tombstone 80 | Defeat removes Apocalyptic Beast's Call Wyvern ability |
| Qu'Pho Bloodspiller | WAR | Adamantking Effigy 86 | Defeat removes Apocalyptic Beast's Mighty Strikes ability |
| Gi'Bhe Fleshfeaster | WHM | Adamantking Effigy 102 | Defeat removes Apocalyptic Beast's Benediction ability |
| Te'Zha Ironclad | PLD | Adamantking Effigy 113 | Defeat removes Apocalyptic Beast's Invincible ability |
| Va'Rhu Bodysnatcher | THF | Adamantking Effigy 126 | Defeat removes Apocalyptic Beast's Perfect Dodge ability |
| Koo Rahi the Levinblade | SAM | Manifest Icon 139 | Defeat removes Apocalyptic Beast's Meikyo Shisui ability |
| Baa Dava the Bibliophage | SMN | Manifest Icon 150 | Defeat removes Apocalyptic Beast's Astral Flow ability |
| Doo Peku the Fleetfoot | NIN | Manifest Icon 180 | Defeat removes Apocalyptic Beast's Mijin Gakure ability |
| Ree Nata the Melomanic | BRD | Manifest Icon 188 | Defeat removes Apocalyptic Beast's Soul Voice ability |
| Stihi | Roams North portion of zone | Defeat removes Apocalyptic Beast's Flame Breath ability | |
| Vishap | Roams South of Mighoya Dunes | Defeat removes Apocalyptic Beast's Poison Breath ability | |
| Jurik | Roams North of Mighoya Dunes | Defeat removes Apocalyptic Beast's Wind Breath ability | |
| Barong | Roams South of Outpost | Defeat removes Apocalyptic Beast's Chaos Blade ability | |
| Tarasca | Roams East of Outpost (mountain perimeter) | Defeat removes Apocalyptic Beast's Heavy Stomp ability | |
| Alklha | Roams East of Shakhrami Zone | Defeat removes Apocalyptic Beast's Body Slam ability | |
| Basilic | Roams West of Mighoya Dunes | Defeat removes Apocalyptic Beast's Petro Eyes ability | |
| Aitvaras | Roams North of Mhaura | Defeat removes Apocalyptic Beast's Voidsong ability | |
| Koshchei | Roams West of Mhaura | Defeat removes Apocalyptic Beast's Thorn Song ability | |
| Stollenwurm | Roams East portion of Khoonta Dunes | Defeat removes Apocalyptic Beast's Lodesong ability | |
| Apocalyptic Beast | All | Roams entire zone | Zone Boss |
General
| Goblin (Vanguard) |
WAR | MNK | THF | WHM | BLM | RDM | PLD | DRK |
| Smithy | Pitfighter | Welldigger | Alchemist | Shaman | Enchanter | Armorer | Tinkerer | |
| BST | BST's pet | BRD | RNG | SAM | NIN | DRG | SMN | |
| Pathfinder | Slime | Maestro | Ambusher | Ronin | Hitman | Dragontamer | Necromancer | |
| Orc (Vanguard) |
WAR | MNK | THF | WHM | BLM | RDM | PLD | DRK |
| Footsoldier | Grappler | Pillager | Amputator | Mesmerizer | Vexer | Trooper | Neckchopper | |
| BST | BST's pet | BRD | RNG | SAM | NIN | DRG | SMN | |
| Hawker | Hecteyes | Bugler | Predator | Gutslasher | Backstabber | Impaler | Dollmaster | |
| Quadav (Vanguard) | WAR | MNK | THF | WHM | BLM | RDM | PLD | DRK |
| Vindicator | Militant | Purloiner | Constable | Thaumaturge | Protector | Defender | Vigilante | |
| BST | BST's pet | BRD | RNG | SAM | NIN | DRG | SMN | |
| Beasttender | Scorpion | Minstrel | Mason | Hamamoto | Kusa | Drakekeeper | Undertaker | |
| Yagudo (Vanguard) | WAR | MNK | THF | WHM | BLM | RDM | PLD | DRK |
| Skirmsher | Sentinel | Liberator | Priest | Prelate | Visionary | Exemplar | Inciter | |
| BST | BST's pet | BRD | RNG | SAM | NIN | DRG | SMN | |
| Ogresoother | Crow | Chanter | Salvager | Persecutor | Assassin | Partisan | Oracle |
Abilities
| Nightmare Bunny | Goblin |
|---|---|
|
|
| Nightmare Cockatrice | Orc |
|
|
| Nightmare Crab | Quadav |
|
|
| Nightmare Crawler | Yagudo |
|
|
| Nightmare Dhalmel | Nightmare Eft |
|
|
| Nightmare Mandragora | Nightmare Raven |
|
|
| Nightmare Scorpion | Nightmare Uragnite |
|
|
Targeting Order
- SMN > BLM > BST > BST's Pet
- WAR = THF = RDM = PLD = DRK = BRD = RNG = SAM = DRK > MNK
- WHM > NIN


